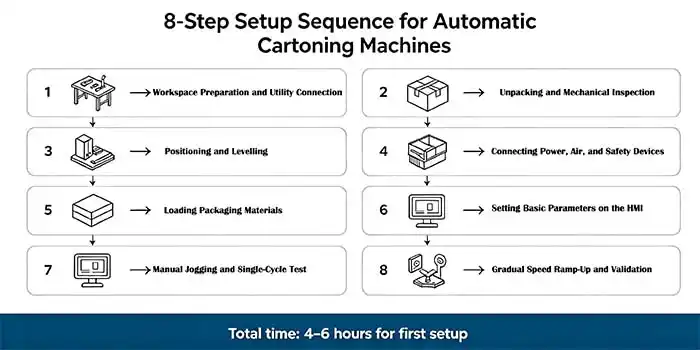
How to Set Up an Automatic Cartoning Machine in 8 Simple Steps
You have just received a new automatic cartoning machine. The crate is on the factory floor, and your production manager is asking: “How soon can we run?” The gap between delivery and full‑speed production often creates anxiety – wrong settings, skipped safety checks, or misaligned feeders can cost hours of troubleshooting.
This guide walks you through an 8‑step setup sequence that applies to most modern automatic cartoners. Follow it exactly, and you will reduce trial‑run waste, protect your machine from accidental damage, and get to stable production faster. No model‑specific shortcuts – just the universal logic that works for horizontal, vertical, and continuous‑motion cartoning machines.
1. Workspace Preparation and Utility Connection
Before touching any mechanical part, secure the environment. Most automatic cartoning machines require:
-
Level floor space – a deviation of more than 2 mm/m can cause vibration and misalignment.
-
Compressed air – typical requirement: 6 bar clean, dry air. Low pressure leads to incomplete carton opening.
-
Electrical supply – check voltage and phase.
Why it matters to you: A skipped air filter check on day one can cause sticky pneumatic cylinders within weeks – meaning unplanned downtime later. Taking 15 minutes now saves days of repair later.
For guidance on choosing a machine that fits your existing utility setup, review our core cartoning machine series designed with flexible utility interfaces.
2. Unpacking and Mechanical Inspection
Open the crate and locate the inspection checklist provided by your supplier. Perform a systematic check:
-
Visual inspection – Look for shipping damage.
-
Loose bolts – Torque all visible fasteners on the frame and conveyor mounts.
-
Protective films – Remove any plastic covers from stainless steel surfaces.
-
Optional accessories – Verify spare parts, manual, and any change parts are present.
Why it matters: A loose sensor bracket may only cause intermittent faults – the hardest type to diagnose. Catching it now saves hours of electrical troubleshooting later.
3. Positioning and Levelling
Move the machine to its final position using rollers or a pallet jack. Then:
-
Place a spirit level on the main frame.
-
Adjust the machine feet until the bubble is centered.
-
Lock the counter‑nuts after levelling.
Common mistake: Levelling only the front side. Always check both directions. An unlevel machine will cause cartons to skew as they travel through the sealing station, resulting in wrinkled or unsealed flaps.
4. Connecting Power, Air, and Safety Devices
Now connect the utilities:
-
Electrical: Route the main cable to your distribution panel. Verify the emergency stop loop is closed.
-
Air: Connect the main air line. Slowly open the valve – listen for leaks. Set the regulator to the pressure specified in your manual.
-
Safety mat / light curtain: Connect to the dedicated safety relay. Test by stepping on the mat – the machine should immediately depower pneumatic actuators.
Why this step is critical: Bypassing safety device testing is the number one cause of operator injury during initial setup. Take the extra 5 minutes to test every e‑stop and light curtain.
5. Loading Packaging Materials
Each automatic cartoning machine has three material feeding stations. Load them in this order:
| Station | Material | Typical setup action | Critical check |
|---|---|---|---|
| Carton magazine | Flat carton blanks | Fan the blanks to separate, load with print side facing correct direction | Carton pick‑up vacuum should pull one blank at a time |
| Leaflet feeder | Folded leaflets | Load in same orientation | Sensor must detect presence – no missing leaflets |
| Product infeed | Bottles, blister packs, sachets | Align product lane width to match carton size | No product should jam before the push rod |
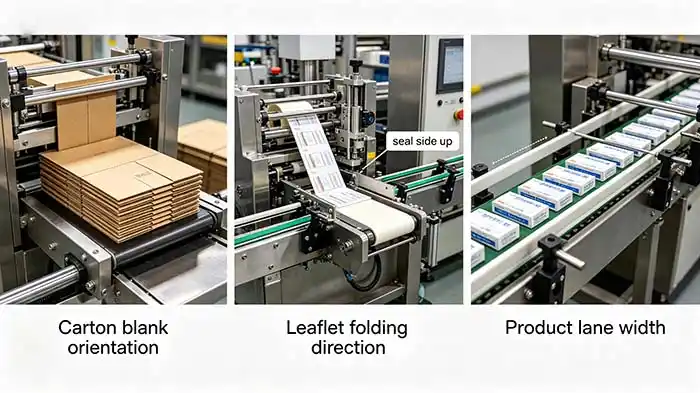
Why it matters to your OEE: Misloaded cartons will be rejected by photo‑eyes, but not before causing a jam. That jam takes 10–15 minutes to clear. Loading correctly the first time avoids that loss.
For industries with high changeover frequency, understanding how material loading interfaces are designed can dramatically improve line efficiency. Learn more about pharmaceutical‑oriented cartoning solutions that prioritise rapid material changeover.
6. Setting Basic Parameters on the HMI
Turn on the control panel. Navigate to the machine setup or recipe section. You will typically set:
-
Carton length, width, height – enter actual dimensions.
-
Product pitch – distance between consecutive products on the infeed conveyor.
-
Leaflet folding type – select from pre‑configured patterns.
-
Output speed – start low for initial testing.
Translation to real benefit: Entering correct carton dimensions tells the machine how far to push the product, how long to hold the glue nozzle, and when to close flaps. A 1 mm error in carton height can cause flap misalignment – leading to open cartons on the reject belt. The HMI gives you fine control to prevent that.
To see how advanced control systems reduce setup time for complex SKUs, you may find this step‑by‑step cartoner changeover guide useful.
7. Manual Jogging and Single‑Cycle Test
Never run at full speed immediately. Instead:
-
Jog mode: Use the “inch” or “jog” button to advance the machine one station at a time.
-
Single cycle: Place one carton, one leaflet, and one product manually in the first stations. Run one complete cycle.
-
Check results: Verify the carton is closed correctly, leaflet is inside, and the product is not crushed.
Common finding in real factories: 70% of initial setup issues are caught during single‑cycle tests – a sensor not seeing a carton flap, a pusher timing off by a few milliseconds. Fixing these at jog speed takes minutes. Finding them at full speed causes parts to break.
Pro tip: Record the sensor positions after successful single‑cycle. This becomes your baseline for future troubleshooting.
8. Gradual Speed Ramp‑Up and Validation
Now you are ready to run continuously:
-
Start at 30% of rated speed.
-
Run 200–300 cartons. Check every 50 cartons for:
-
Correct flap closing
-
Glue pattern consistency
-
Reject rate
-
-
Increase speed in 10% increments every 200 cartons.
-
Final validation: Run 30 minutes at target speed – record reject count and any stoppages.
Why this protects your investment: A sudden jam at top speed can bend push rods or damage carton opening fingers. Ramping up gradually lets the machine “settle in” and reveals marginal issues before they become catastrophic.
Once you have completed this 8‑step process, you will have a validated baseline. The next logical step is to fine‑tune changeover procedures for different carton sizes – a topic covered in our detailed changeover optimisation guide.
Real‑World Example – A First‑Time Setup in a Nutraceutical Plant
A mid‑sized nutraceutical company purchased their first automatic cartoning machine. Their team followed exactly the 8 steps above:
-
Step 4 (safety test) revealed a mis‑wired light curtain – corrected before any power‑on.
-
Step 6 (HMI parameters) – they initially entered carton height 2 mm too small. The single‑cycle test (Step 7) showed a “flap not closed” error. They corrected the dimension immediately.
-
Result: From crate opening to stable 150 cartons/min took 4.5 hours – far below the industry average of 1–2 days for first‑time users.
Key takeaway: The sequence works because each step builds on the previous one. Skipping safety or levelling will inevitably cause a problem later.
For facilities that need to integrate a cartoner with upstream blister or pillow packaging lines, understanding the complete line integration approach is essential. Explore blister‑cartoning integrated solutions to see how setup differs when machines are synchronised.
Next Step – From Setup to Optimisation
Mastering the initial setup is only the beginning. Once your cartoning machine runs reliably, you will face questions like: “How do I reduce changeover time between SKUs?” or “What preventive maintenance schedule extends machine life?”
That is where a deeper operational guide becomes valuable. You can continue learning with our preventive maintenance checklist for automatic cartoners – a practical resource that helps you avoid the 5 most common causes of unexpected downtime.
Related Reading
-
Preventive Maintenance Checklist for Automatic Cartoning Machines
-
How to Reduce Changeover Time on a Cartoner
-
Common Cartoner Faults and How to Fix Them Without a Technician
-
Integrating a Cartoner with a Blister Line: Synchronisation Tips
-
OEE Improvement: Why Cartoning is Often the Hidden Bottleneck